This article provides some quick instructions on creating an NFS server for use as Persistent Storage in Kubernetes. A different article will discuss creating Persistent Storage.
Firewall Configuration
For the NFS server, it only will be accessed by Kubernetes so we’ll restrict access to the NFS share to the environments network. To do that and not block access via ssh, we’ll create a new firewall zone called nfs. We’ll add nfs, rpc-bind, and mountd to that zone plus add the network range. Ultimately we’ll have the following configuration.
# firewall-cmd --zone nfs --list-all
nfs (active)
  target: default
  icmp-block-inversion: no
  interfaces:
  sources: 192.168.101.0/24
  services: mountd nfs rpc-bind
  ports:
  protocols:
  forward: no
  masquerade: no
  forward-ports:
  source-ports:
  icmp-blocks:
  rich rules:
NFS Configuration
To prepare the storage, we’ll create the three directories. We’re creating a registry directory for OpenShift/OKD4 although it’s not used in Kubernetes. I do have an OKD4 cluster that will use this storage as well.
This article provides instructions in how I set up my HAProxy servers (yes two) to provide access to the Kubernetes cluster.
Configuration
To emulate a production like environment, I’m configuring two HAProxy servers to provide access to the Kubernetes cluster. In order to ensure access to Kubernetes, I’m also installing keepalived. In addition, I’m using a tool called monit to ensure the haproxy binary continues to run in case it stops.
The server configuration isn’t gigantic. I am using my default CentOS 7.9 image though so it’s 2 CPUs, 4 Gigs of memory, and 100 Gigs of storage but only 32 Gigs are allocated.
HAProxy
I am making a few changes to the default installation of haproxy. In the global block the following configuration is in place.
global
        log /dev/log local0
        log /dev/log local1 notice
        chroot /var/lib/haproxy
        stats socket /var/lib/haproxy/admin.sock mode 660 level admin expose-fd listeners
        stats timeout 30s
        user haproxy
        group haproxy
        daemon

        # Default SSL material locations
        ca-base /etc/ssl/certs
        crt-base /etc/ssl/private

        # Default ciphers to use on SSL-enabled listening sockets.
        # For more information, see ciphers(1SSL). This list is from:
        #  https://hynek.me/articles/hardening-your-web-servers-ssl-ciphers/
        # An alternative list with additional directives can be obtained from
        #  https://mozilla.github.io/server-side-tls/ssl-config-generator/?server=haproxy
        ssl-default-bind-ciphers ECDH+AESGCM:DH+AESGCM:ECDH+AES256:DH+AES256:ECDH+AES128:DH+AES:RSA+AESGCM:RSA+AES:!aNULL:!MD5:!DSS
        ssl-default-bind-options no-sslv3
In the defaults block of the haproxy.cfg file, the following configuration is in place.
defaults
        log     global
        mode    http
        option  httplog
        option  dontlognull
        timeout connect 5s
        timeout client  50s
        timeout server  50s
I also added a listener so you can go to the web page and see various statistics on port 1936. Don’t forget to set the firewall to let you access the stats.
listen stats
        bind *:1936
        mode http
        log  global
        maxconn 10
        stats enable
        stats hide-version
        stats refresh 30s
        stats show-node
        stats show-desc Stats for the k8s cluster
        stats uri /
        monitor-uri /healthz/ready
There are two ports that need to be open for Kubernetes control plane nodes. Ports 6443 for the api server and 22623 for the machine config server. Set up the frontend and backend configurations as follows:
frontend kubernetes-api-server
        bind *:6443
        default_backend kubernetes-api-server
        mode tcp
        option tcplog

backend kubernetes-api-server
        mode tcp
        server bldr0cuomkube1 192.168.101.160:6443 check
        server bldr0cuomkube2 192.168.101.161:6443 check
        server bldr0cuomkube3 192.168.101.162:6443 check


frontend machine-config-server
        bind *:22623
        default_backend machine-config-server
        mode tcp
        option tcplog

backend machine-config-server
        mode tcp
        server bldr0cuomkube1 192.168.101.160:22623 check
        server bldr0cuomkube2 192.168.101.161:22623 check
        server bldr0cuomkube3 192.168.101.162:22623 check
For the worker nodes, the following configuration for ports 80 and 443 are required.
frontend ingress-http
        bind *:80
        default_backend ingress-http
        mode tcp
        option tcplog

backend ingress-http
        balance source
        mode tcp
        server bldr0cuomknode1-http-router0 192.168.101.163:80 check
        server bldr0cuomknode2-http-router1 192.168.101.164:80 check
        server bldr0cuomknode3-http-router2 192.168.101.165:80 check


frontend ingress-https
        bind *:443
        default_backend ingress-https
        mode tcp
        option tcplog

backend ingress-https
        balance source
        mode tcp
        server bldr0cuomknode1-http-router0 192.168.101.163:443 check
        server bldr0cuomknode2-http-router1 192.168.101.164:443 check
        server bldr0cuomknode3-http-router2 192.168.101.165:443 check
Before starting haproxy, you’ll need to do some configuration work. For logging, create the /var/log/haproxy directory as logs will be stored there.
Since we’re using chroot to isolate haproxy, create the /var/lib/haproxy/dev directory. Then create a socket for the logs:
python3 -c "import socket as s; sock = s.socket(s.AF_UNIX); sock.bind('/var/lib/haproxy/dev/log')"
To point to this new device, add the following configuration file to /etc/rsyslog.d called 49-haproxy.conf and restart rsyslog.
# Create an additional socket in haproxy's chroot in order to allow logging via
# /dev/log to chroot'ed HAProxy processes
$AddUnixListenSocket /var/lib/haproxy/dev/log

# Send HAProxy messages to a dedicated logfile
if $programname startswith 'haproxy' then /var/log/haproxy/haproxy.log
&~
keepalived
Since there are two servers, I have hap1 as the primary and hap2 as the secondary server. On the primary server, use the following configuration.
The monit tool watches running processes and if the process ceases to exist, the tool restarts the process. It can be configured to notify admins as well. The following changes were made to the default monit configuration.
Note that the username and password appear to be hard coded into monit. The best I could do was ensure access was read-only.
set daemon  120              # check services at 2 minute intervals

set log /var/log/monit.log

set idfile /var/lib/monit/.monit.id

set statefile /var/lib/monit/.monit.state

set eventqueue
    basedir /var/lib/monit/events  # set the base directory where events will be stored
    slots 100                      # optionally limit the queue size

set httpd
    port 2812
     address 192.168.101.62                  # only accept connection from localhost
     allow 192.168.101.62/255.255.255.255    # allow localhost to connect to the server
     allow 192.168.101.90/255.255.255.255                    # allow connections from the tool server
     allow 192.168.0.0/255.255.0.0                           # allow connections from the internal servers
     allow admin:monit read-only   # require authentication

include /etc/monit.d/*
At a prior job I used Artifactory to manage images. The nice thing about Artifactory is you can create a Virtual Repository in that you configure it to automatically pull images from a Remote Repository to make it available as if it was a Local Repository.
What Docker Distribution is is a simple Docker Repository. Since I’m on High Speed Wi-Fi here in the mountains, I don’t want to keep pulling images and disrupting both our bandwidth but neighbors bandwidth as it’s WiFi.
Installation
Installing the software is easy enough.
# yum install -y docker-distribution
Once installed, check the /etc/docker-distribution/registry/config.yml file for settings but for me, the default is fine. When finished, enable and start the tool.
I wanted to be able to view what was in the repository and there wasn’t an easy to do it without going into the /var/lib/registry/docker/registry/v2/repositories and parsing out the _manifests and tags directories. As a result, I created an index.php script that parses it out and displays it. In order to do so, I installed the web server and php.
The steps involved in managing local images is pretty easy over all. I have a separate docker server I use for building images. Over there I pull the image, tag it, and push the image to the local repository.
docker pull registry.k8s.io/kube-apiserver:v1.25.7
docker tag registry.k8s.ip/kube-apiserver:v1.25.7 bldr0cuomrepo1.dev.internal.pri:5000/kube-apiserver:v1.25.7
docker push bldr0cuomrepo1.dev.internal.pri:5000/kube-apiserver:v1.25.7
Once all the images are uploaded, you can then delete any images on the docker server to keep things cleaned up.
This article provides instruction on how to use Terraform to build virtual machines on VMware.
Preparation
I use templates to build virtual machines and have several templates in order to build systems quickly. I mainly had a single machine for each type of system that I want to use to test things.
CentOS 7
CentOS 8
Debian 10
Red Hat Enterprise Linux 8
Rocky Linux 8
SUSE 15
Ubuntu 20
Each of these template images is updated periodically or replaced, has my personal account on it, has my service account, and is configured so my service account is able to run ansible playbooks against any built machine.
In order for the process I’m using to build machines, I’ve created a unique template for each environment that begins with the environment name (bldr0, cabo0, and so on). In addition, to speed up builds, I have duplicates in each environment for each of my R720XD servers (Monkey, Morgan, and Slash). It speeds up from around 6 minutes to provision a VM to 2 minutes. If you have shared storage, having a single template would work fine. I’ve configured the VM to have a base template IP address (192.168.101.42, and so on) in order for the Terraform script to be able to communicate and configure the new machine. The templates also have some standard information such as the service account, ssh keys, sudoers access, and the necessary standard groups (sysadmin and tmproot).
Process
I’m a learn from example person and tend to look for a page where someone has a successful build process. The problem I find with official documentation is it has to address all possibilities so it’s a lot more complicated to parse and apply. It’s one of the reasons for this documentation as it’s just what’s needed to build the environment for my purposes. Sometimes even the best docs don’t explain everything, for example Gary’s docs don’t provide information on the example shell script he listed at the end of his docs.
Per the Terraform docs, they don’t recommend using a provider to reconfigure your new virtual machine. The suggestion is to mount a virtual CD similar to the cloud-init image to automatically configure the VM. The reason for this makes sense. For the provider process, you’re logging into the new VM so you have to have the credentials in the Terraform script plus have a unique shell script to run any commands you want to run to reconfigure the new VM.
Personally in a homelab environment, I don’t have a problem with this and it is easier than building a CD image and a process for accessing it and reconfiguring the VM.
Configuration
The first part is to set the variables used to build the virtual machine. I would suggest using Hashicorp Vault to manage credentials. Note that my kvm Terraform installation I use a variables file and fill in a module when building systems. I plan on that here as well so the document will be updated (again) when I figure that out.
For the below configuration, I’ll have my information since I’m using this document to rebuild my environment if needed. Update it with your information. I will hide the credentials of course.
I’m using a pretty basic vCenter configuration. I don’t have centralized storage and am not using centrally managed network configurations. It’s just easier and less complicated.
About the only thing I haven’t figured out yet is how to place the new VM in the correct folder. If I figure it out, I’ll update this document.
provider "vsphere" {
  # If you use a domain, set your login like this "Domain\\User"
  user           = "administrator@vcenter.local"
  password       = "[password]"
  vsphere_server = "lnmt1cuomvcenter.internal.pri"

  # If you have a self-signed cert
  allow_unverified_ssl = true
}

data "vsphere_datacenter" "dc" {
  name = "Colorado"
}

# If you don't have any resource pools, put "/Resources" after cluster name
data "vsphere_resource_pool" "pool" {
  name          = "192.168.1.15/Resources"
  datacenter_id = data.vsphere_datacenter.dc.id
}

# Retrieve datastore information on vsphere
data "vsphere_datastore" "datastore" {
  name          = "NikiVMs"
  datacenter_id = data.vsphere_datacenter.dc.id
}

# Retrieve network information on vsphere
data "vsphere_network" "network" {
  name          = "QA Network"
  datacenter_id = data.vsphere_datacenter.dc.id
}

# Retrieve template information on vsphere
data "vsphere_virtual_machine" "template" {
  name          = "cabo0cuomcentos7_monkey"
  datacenter_id = data.vsphere_datacenter.dc.id
}
System Built
The second section defines the build for Terraform and creates the VM. At the end the remote-exec provisioning pushes up the shell script which reconfigures the new VM.
The resource name, ‘cabo-02’ gives me a unique name in the Terraform state file so that I can manage different machines. This one is for cabo0cuomkube1. The cabo0cuomkube2 system will be ‘cabo-03’ and so on.
We define the number of CPUs and RAM in case it’s different from the main template (2 CPUs and 4 Gigs of RAM).
In the disk block, define the template to be used. The clone block will then build the system using that image.
The remote-exec process provides the credentials to upload the script.sh shell script. The host line is the template IP address which is the same for every VM created in this environment (cabo).
# Set vm parameters
resource "vsphere_virtual_machine" "cabo-02" {
  name             = "cabo0cuomkube1"
  num_cpus         = 4
  memory           = 8192
  datastore_id     = data.vsphere_datastore.datastore.id
  resource_pool_id = data.vsphere_resource_pool.pool.id
  guest_id         = data.vsphere_virtual_machine.template.guest_id
  scsi_type        = data.vsphere_virtual_machine.template.scsi_type

  # Set network parameters
  network_interface {
    network_id = data.vsphere_network.network.id
  }

  # Use a predefined vmware template as main disk
  disk {
    label = "cabo0cuomcentos7_monkey.vmdk"
    size = "100"
  }

  # create the VM from a template
  clone {
    template_uuid = data.vsphere_virtual_machine.template.id
  }

# Execute script on remote vm after this creation
  provisioner "remote-exec" {
    script = "script.sh"
    connection {
      type     = "ssh"
      user     = "root"
      password = "[password]"
      host     = "192.168.102.42"
    }
  }
}
Shell Script
Finally the shell script simply has commands used to reconfigure the VM.
#!/bin/bash

hostnamectl set-hostname cabo0cuomkube1.qa.internal.pri

nmcli con mod ens192 ipv4.method manual ipv4.addresses \
  192.168.102.160 ipv4.gateway 192.168.102.254 ipv4.dns \
  192.168.1.254 ipv4.dns-search 'qa.internal.pri schelin.org'

shutdown -t 0 now -r
Due to the shutdown command, the script exits with a non-zero value so an error will be reported.
And that’s it. The VM should be created and accessible via the new IP address after it reboots.
I keep trying to find documents and videos that do an installation of Kubernetes along with associated configurations and including ArgoCD for an environment like mine. This index shows the final Kubernetes installation (list of all pods) plus an index of articles I write (with references) to document the support and build process.
Note that I do have other Kubernetes type articles here, this is a start to finish build series of articles. While they’re all dated November 20th, that’s to let you go from one to the next by clicking on ‘next article’ at the bottom. I did include a couple of prior articles and didn’t change the date so you’ll need to return to the index to continue for them.
My environment consists of a vCenter cluster of three Dell R720XD servers. Virtual machines are created with Terraform from templates which already have the OS (CentOS 7 or Rocky Linux 8) and some basic configurations such as my personal account and a service account that specifically permits NOPASSWD access for the Ansible playbooks.
Note that there’s a problem with Podman (docker replacement for Red Hat based systems) and my container network software (CNI) so I went with CentOS 7 for now. With automation, once it’s working I can rebuild everything quickly 🙂
System descriptions will be provided in the individual documents.
Repositories
These are my github sites with my terraform, ansible playbooks, and gitops yaml files used to build and configure Kubernetes.
I will note that the ones on github are copies of my internal gitlab server. A couple of the repos are connected to github to push updates when I update a master branch but most need me to switch to the main branch, git pull, and then git push github to get the updates publicly available, meaning I have to remember to do so.
I do have a separate git repo for configurations and ansible-vault files which are applied after the main software is deployed. For this project, the Llamas website doesn’t have a separate configuration but other repos such as the Ansible and GitOps repos have separate configuration repos.
In this scenario, you’ll use the Terraform scripts to build the Virtual Machines. When all are up and running, you can use Ansible to configure the new VMs.
Next up would be to further initialize the new VMs. The Process is to run the newserver/initialize Ansible playbook and which install more common configurations but also configurations subject to change, so they aren’t in the template.
Finally, I have a suite of scripts used to manage the servers. Extract information for the inventory for example. Run the utility/unixsuite playbook to install the scripts.
When the core playbooks are done, follow the articles to prepare, create, and configure Kubernetes.
This is a list of the articles for creating the on-prem infrastructure, building a cluster, installing ArgoCD, and ultimately installing the Llamas band website. I also want to install AWX which is the upstream of Red Hat’s Ansible Automation Hub (formerly Ansible Tower). If no link below, then I’m still working on the installation or page.
This is the index article that will provide links to individual articles on the conversion of one of my projects from a php/mysql(mariadb) to python and postgresql. There shouldn’t be too many however like my Kubernetes and ArgoCD series of articles, I’ll be doing this from the server build using terraform, the installation of postgresql 15 (current as of this writing), and the various tasks I need to perform to migrate my Status Management app.
Repositories
I have a github site that contains a bunch of my projects. For this one, I’ll be adding the server build to the existing terraform repository and will use the server configuration repository to configure the new server. Once done, I’ll create a new repository for the Status Management application itself and as I progress, I’ll update it until it works with Python and Postgresql.
Goals
What am I trying to achieve here? Well, I want to learn Python more than the quick dabbling I do. I’m more comfortable with perl and shell scripts but more and more jobs require Python knowledge. I could get up to speed quickly enough I think if I was put in such a position but it’d be nice to be reasonably familiar first. Secondly I learn best when I have a project to work on. Going through the tutorials and building yet another hello-world application in python is boring and most of the books start off with teaching everything from the beginning. I don’t need to know how to code. I’ve been writing programs since the early 80’s.
And the same with Postgresql. I’m pretty familiar in general with MySQL and of course MariaDB but Postgresql is another one I should have some familiarity with. This project will show me how to migrate my existing data from mysql over to postgresql and of course how to properly craft statements in python to access the data and present it as a web page. It’ll be fun as always as I enjoy such thing immensely.
As part of the game retail store business, I needed to contact the various game distributors to create accounts and start buying stock. Fortunately the current owners have accounts and contacts so can help get the accounts going. I’ll be listing the distributors I’ve contacted and completed the application process and added bits when the process has completed and been approved.
First off, many of the distributors have multiple Terms. Such as prepay with a credit card, cash on delivery, check on delivery, and net terms meaning you’ll order and pay in some number of days. I’ve seen net-30 and net-45 for 30 days and 45 days. In our case we’re either prepaying with a credit card or providing a check upon delivery (COD).
The main issue I have here is the requirement of a Social Security Number. It’s added to the application and sent via email, not the most secure method. I’ve noted that I’ve not added the information but if needed, please call and I’ll provide it. So far it’s only needed when we’re looking for credit from the distributors, aka the net-30 or net-45 terms. Since we’re not doing that, none of the ones that have approved the applications have had an issue with me not providing the SSN.
Magazine Exchange
The contact at Magazine Exchange said we’d simply update the current account with a new credit card and we’re ready to go. I did fill out an application so they had my details and sent it in. Then we made sure we had a good password, added my business credit card, and deleted the other credit cards. All done, easy peasy. The contact at the business was very helpful.
Games Workshop
These are the guys who own Warhammer, a massive miniatures gaming industry. We got in contact with the current account manager, got the paperwork filled out and submitted, and within a few days it was approved and we’re ready to go. Again, pretty easy.
Stonemaier Games
This is the first game specific company. They create the games and sell directly to brick and mortar stores vs going through a distributor. They get to keep a little more money and are in touch with actual brick and mortar stores vs one or two distributors.. I can see it being a touch more complicated having hundreds of stores to manage vs a couple of distributors but it works out for them. I filled out the short application and shortly I was approved and had access to their site to purchase games. We actually ordered quite a few games and expansions which should be here in a few days. This was by far the easiest new account process.
Southern Hobby
We’re looking at bringing in Gundam models and having additional distributors. The distributors can have longer term retailers who might get more games available to them than a newer or smaller shop. If Target buys 10,000 copies of some game and we buy 12, they’re going to get priority for sure. With multiple distributors though, we might get 8 here and 8 at one of the other places. Anyway, they required a survey be completed before I can even apply. This is good as they’re doing due diligence in making sure they’re selling to brick and mortar stores instead of someone buying and selling on ebay. Support your local game store. Anyway it’ll be a week or so before I can even get an application and this is also a new account.
ACD Distributors
We actually have a point of contact here. The application is pretty extensive looking for business references, bank references, and the like. They are one of the bigger distributors though. I had to chat with the current owners to get some of the information they were looking for. Once completed, I scanned in the application and sent it to the point of contact. We’ll see how this goes.
Alliance Distributors
This is also one of the more extensive applications. Here they were looking for business references, bank references, lease references, and a personal reference. Most other information was the same as what was on the ACD application. These guys wanted a copy of my drivers license, a copy of my state tax license, and some other bits that Colorado doesn’t require. I got it all filled out and had to hunt through the documentation in order to find out where to send the application and additional docs but I got it sent off. Now we wait.
Asmodee
I already had an account with these guys. I filled out a contact form to inquire as to how to change it from a Consumer account to a Retailer account. Waiting on them now.
Conclusion
There are a couple of others we’re considering but I haven’t started the process yet. We have orders with Magazine Exchange and Stonemaier Games plus a pending order with ACD so they were the ones I focused on. We do get games from Alliance and Asmodee so we’ll want them eventually and Southern Hobby is one we want to join.
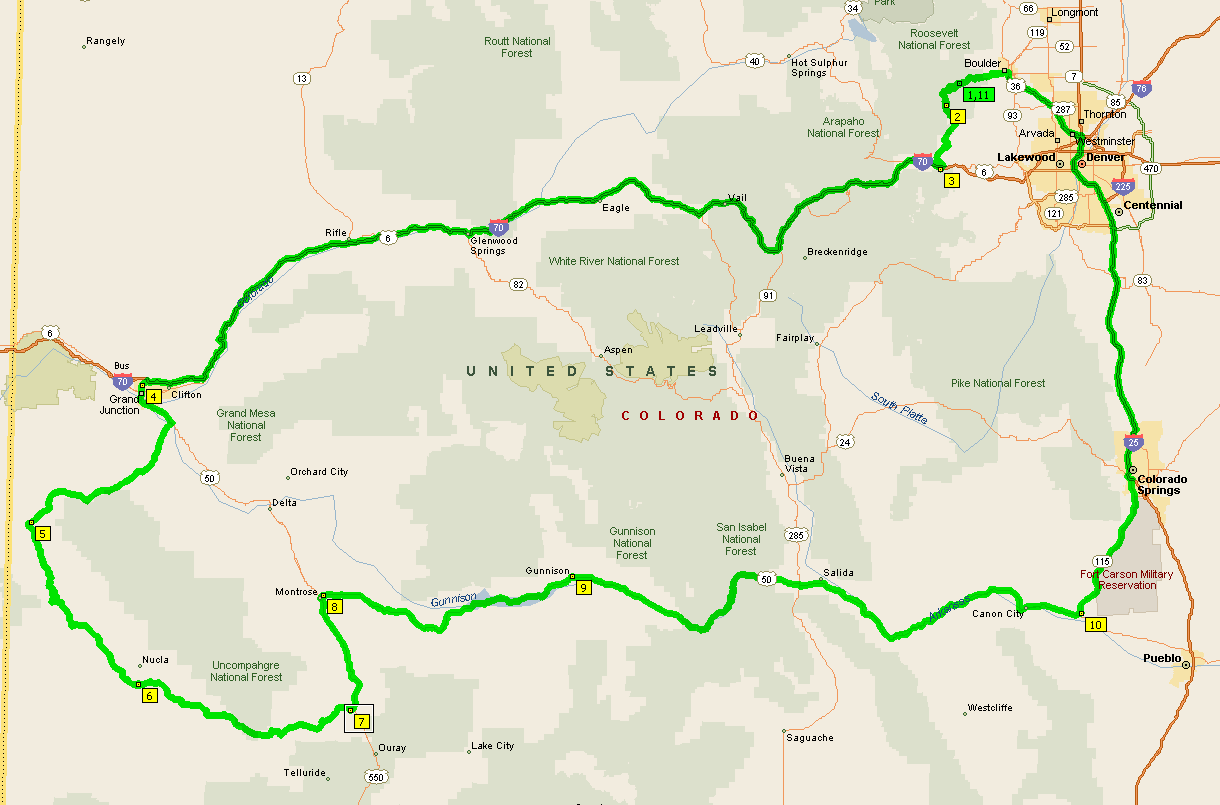
Time to get up! We’re going to head up rt 50 and home today. I intend on stopping at the Black Canyon of the Gunnison park to show Samantha. Plus we’re going over Monarch Pass which is at 11,000′ so it’ll be cold! We might even get some snow. The lady at the desk said it was calling for snow at the higher elevations. I checked the weather at various places and over at Vail it was calling for some snow showers but nothing at Gunnison so I figured it was better to continue with the plan.
I let Samantha know it was going to be cooler and after some discussion, I offered my spare pants and she took me up on it. It’s a tad bit at the waist but we had a strap from the bike and we tightened it up. Hilarious! 🙂
We got all dressed up, warm and rain gear on. She’d picked up a hooded sweater thing she had under her coat. We need to be warm! Now generally I’m pretty used to the different weather and personally I enjoy colder conditions so I’m warm enough but Samantha is a bit more susceptible to colder weather.
We stopped at the gas station to fill up before heading out and then we were off. I passed vehicles when I could and Samantha would catch up. Good job! 🙂 At one point we got to a construction area and we were on the muddy shoulder so it was slipping just a little. I wanted to remember to remind Samantha to be careful in such situations in that you might feel a bit over confident and forget that you have mud on the tires and slip and slide. Also safely passing folks. Keep an eye on oncoming traffic and if there’s a line behind a semi or someone pulling or driving an RV, to try and stay to the right of the road so folks see you sooner and don’t try to pass.
I kept looking for the turn off for the Black Canyon of the Gunnison but never saw a sign. I suspect there was a different sign we missed. Ah well, we eventually stopped in Gunnison to get gas and take a break. It had been slightly snowing on the way to Gunnison so I expected a bit more when we got to Monarch Pass. Samantha snagged a neckerchief to keep her neck warmer (blocking the wind anyway) and I picked up a gaiter. Warmed up, we’re ready to head up Monarch Pass
The ride up was pretty cool in general. It kept getting colder and snow on the trees. Then it started snowing a bit more and the roads were wet in places. As long as the temps were high enough, it was just water but we were still pretty careful and in a couple of places as we approached Monarch Pass there was a little sand in the road so the back tire stepped out a couple of times. Nothing I couldn’t deal with but I was concerned about Samantha but she handled it like a pro.
I was tempted to pull in but it looks a bit sketchy and I was concerned that Samantha would have a problem on the gravel and potential ice and snow so we kept heading down the mountain. We stopped in Salida to take a break and get gas. In the background is the pass with the blowing snow. I suspect it got worse as time went on.
We headed on looking for lunch. In Canon City we stopped at a Dairy Queen and stripped off the warm gear. We grabbed lunch and I checked the map. It looked like we should take rt 115 up to Colorado Springs if we planned on getting home before 6pm.
Heading out rt 50 was a pretty straight four lane road and we took advantage of the road and hit it in places. I certainly hit triple digits to avoid some of the traffic.
At rt 115, we took the exit and headed north towards Colorado Springs. Again it was a pretty clear road but I was a bit more subdued making sure Samantha was behind me. Once we got to I25 we headed north. I was looking for an easy off and on exit so we could gas up and take a quick break.
I let Samantha know it was freeway time and to drive safe. We were heading north so look for the 20th street exit. On the left side is the HOV lane where motorcycles can ride without paying a toll. Then we’ll want to hit rt 36 towards Boulder and we’ll stop for gas when we can. I said if I reached the toll road before she did, I’d wait where she could see me and if she reached it first, she’d wait on me.
We had to take a right out of the gas station and find a place to turn around and get back on I25. We made it to the freeway and headed north.
Personally I hate being surrounded by cars and if I can find a path out and into the clear I’ll do it. I also like being in the left lane but will move over when someone overtakes. It gives me just one side of the lane to guard vs having to worry about both the left and right sides. We got on next to a couple of cruisers and a truck in the front with a couple more in a trailer in the left lane. I was looking to get in front but it didn’t seem to open up. I spotted an opening coming up on the right and took it, right and then left in front of the car that was in front of me, then left again into the left lane and clear sailing. I kept an eye out for Samantha but she didn’t get out of the clot of traffic.
I kept heading north and getting into Denver, I slowed and moved into the middle lane waiting on Samantha. It wasn’t long as she moved up in the left lane and kept on going. I dropped in behind her and she was really moving. Eventually we got to the toll road and we headed on up with me taking the lead. We got off on rt 36 and headed up. It took a bit before I was comfortable enough to take the exit for Sheridan Road. I waved her over and we got off to get gas. I made the light but she missed it so I waited up just a touch until she made the light. Then we headed over rt 36 and into the right hand left turn lane (two left turn lanes). There was a truck to our left. Light changed and we made the turn but the truck tried to merge into our lane. BEEP!! Asshole!
The cards weren’t working at the pumps so I had to prepay for both of us. I gave the guy a serious head shake as I headed to the shop. After filling up, we headed back to rt 36 and headed towards Boulder.
Traffic wasn’t too bad and we got off on Baseline Road, headed up to Broadway, then a left on Canyon and headed up toward Nederland. At Hurricane Hill, we made the right, then a right on Ridge Road, then a right on Rocky Knob Lane and we’re home.
Hugs!
Total trip miles: 781.7 miles per Streets and Trips
The Studio 6 was actually pretty nice in general. The problem was I’d laid the Camelbak on the bed last night before heading to Outback and it leaked water on the foot of the bed. As such, I slept in a bit of a puddle all night. Once you warm up the water, it’s not all that bad. 🙂
I tend to be a very early riser, getting up around 5am but on the trip, I got up at 6am 🙂 I took a shower and packed up my gear getting it on the Concours until I woke Samantha up. Aren’t I nice? 🙂
I pulled the Hayabusa up to the door and showed Samantha how to clean and wax the chain. I have a stand that lets the rear wheel turn freely. Humorously it’s been so long that it took a few minutes to figure out how to lever the bike onto the kickstand to get the other stand in place. I used WD40 to clean the chain and then chain wax once it dried.
Samantha saved some of dinner for breakfast so while I was finishing up the Hayabusa, she was hitting the left overs.
Once we were all packed up, and searched the room to make sure nothing was lost (Sam found an old water bottle under the bed, cleaning staff!) we headed out. After a bit of riding, we hit a gas station to top off the bikes. Even though we filled up last night not long before, we’re going to be hitting Rt 141 and there may not be gas for 100 miles. Better to top off before leaving.
But when I was trying to open my tank, I pushed a bit too hard on the key in the tank and bent it! I was able to bend it back to just about straight but I didn’t want to muck with it too much so I put it in the ignition and pretty much left it there and used the spare key from then on. I’ll need to try and straighten it out better when we get home.
And when done, we headed out. I made a turn on the alternate rt 70 and within a few minutes I realized we weren’t on rt 50. I pulled over and let Samantha know what happened. We made a left turn to a side road and parking lot to get turned around and back to 29th street. A left turn (and I needed to wait as I made the light but Samantha didn’t), and headed on to get into rt 50 south.
At rt 141, we made the right turn and headed for Gateway and then Naturita. What a beautiful morning though. Nice and cool and a bit cloudy. It was matching the weather report, if just a little cooler but the day is early. After a few minutes into the ride, I pulled over to a flat paved pull out. I’ve been careful since Samantha had the issue with the slight hill and figured there might be issues with gravel too. Best to be careful 🙂
Samantha seems to be enjoying the ride 🙂
As we progressed though, there was darkness ahead. It was straight and a bit to the right so I was hoping we would skirt the rain. I was eyeing oncoming traffic to see if they showed some rain on the windshields and sniffing to determine if it was raining up ahead. You know the nice smell of fresh rain on asphalt. Nothing so far. But as we continued, it was clear we were going to be riding through some rain and lightning. Time to pull over and get set.
Because I have such big feet, I generally take off my boots, get the Tourmaster rain pants on, then put my boots back on. But as noted yesterday, I’m prepared. I brought rain gear, bought a second set of rain glove covers for Samantha, and I’m using waterproof gear bags to keep things dry.
As we approached Gateway, it got clear and dryer. Fortunately there was a gas station so we pulled over and filled up. Since I’m paying for both vehicles, occasionally there’s a problem where the bank balks when I run the card twice and since the two bikes use different octanes, I can’t fill it with the same pump (well I could but it’d be a waste). In this case, the pumps wouldn’t even take the cards. I had to go inside and prepay. It worked out though.
I’d passed on to Samantha that she could stop at any time. I was watching behind and if I saw her stop, I’d stop and maybe head back if I got too far ahead. But generally she waited for me to stop.
I was keeping an eye on the scenery and pulled over at a pretty cool spot for a picture.
Looks like rain ahead so we’re not removing gear yet. We’re still about half way to Naturita.
We did stop one more time on the way to Naturita for a quick break. I’ve generally been taking a break one way or the other about every hour. We were next to a small river and Samantha got a bit disgusted due to the ants on the ground and we had to shake off a bunch of them before we could get going again 🙂
In Naturita we stopped for gas and a break. We chatted up a couple of cruiser riders asking where they were going as we were going to tell them it was raining further on to Gateway but they were turning back anyway.
I kept trying to get maps working but I wasn’t getting much of a signal. I wasn’t too sure which direction to head and we pulled into a Dollar store but they didn’t have any maps. Samantha asked and the guy said if we kept on the road we were on, we’d reach Montrose in a couple of hours vs 3 hours if we went via Nucia. So off we went.
It’s been pretty windy on this trip and rainy in spots. I pulled into a large scenic area on our way down and it was stupid windy. It blew my helmet off the bike! But it was a great view. I did pull Samantha’s bike around due to the gravel and the angle of the Hayabusa.
From here we headed down to Ridgeway and then made the turn north to Montrose. I called Jeanne to see what hotels might be available and eventually we headed for a Days Inn on rt 50 east of Montrose. Checked in and parked the bikes. It had rained a bit on our way in so we planned on taking a walk to find dinner.
I figured to catch something local vs some fast food place but man, it’s Sunday in Montrose and nothing at all is open except fast food. We headed down rt 50 and Main Street to the main drag. We walked almost 1.5 miles and we found a Subway.
Personally I’m not much of a fan of Subs in general unless it’s a Philly Steak and Cheese and my experience at Subway was their Steak was (to me) adulterated with green peppers and onions. Personally I just want steak and cheese and not peppers. Just what I’m used to I guess. Fortunately they had unadulterated steak! Woo! So I had a pretty good steak and cheese sub and Samantha had some odd thing 😀 I also had a couple of chocolate chip cookies and a soda.
When we got done, we headed back but it’d started raining! We got wet for sure walking back. Not much we can do about it other than tough it out. There was one gigantic puddle we’d avoided on the way out but I splashed through it on the way back. My boots are waterproof and my feet stayed dry. We got back without too much trouble and a bit damp.
Samantha checked her wounds and she started bruising up pretty nicely.
And the the back.
I did some reading and Samantha crashed hard, snoring a bit. Some time in the night she woke up and I vaguely remember asking why she was awake. “I work nights!” 😀
Samantha (my daughter) and I have been planning a couple of rides for the past several months. She attended a motorcycle repair school down in Florida and has ridden standards and cruisers a bunch of times so has some experience. This will be the first time on a sport bike, my Hayabusa. Other than a few parking lot rides of course 🙂 She also didn’t have her endorsement for Colorado so she attended a BRC put on by a local place, passed, and has her endorsement now. Good job!
There are two rides. One out to California, up the Pacific Coast Highway, over to Glacier National Park, then south through Yellowstone National Park, Grand Tetons National Park, and whatever else might pop up on the map during the trip.
This is also a meet and greet with cousin Holly and her hubby Jesse, aunt Merrie Ann and Frank, and whomever might be around to chat up.
After some discussion, I plan on taking the Mustang Convertible and the Hayabusa. Samantha is somewhat sensitive to cold so I figure heading up the coast might be an issue and we can simply swap so I’m on the bike and she’s in the car. In general though we’ll ride and swap half days throughout the trip.
But to test it out, I figured on taking a short Memorial Day ride. Just a couple of days to see how Sam handles the Hayabusa and see if she is up to longer rides than the couple of hours she’s done, per ride, in the past.
One of the things I did with the bike was replace the headlight. It was pretty scratched up from years of riding and man did that make a difference. The headlight is nice and bright now.
As part of that, I also cleaned and checked the bike out. It seems to be leaking a little oil and I’ll need to track that down. Plus it’ll need a new rear tire before going on a longer trip.
I also cleaned the Concours as I’ll be riding that during the Memorial Day ride. Made sure all the fluids were topped off and we’re ready to go.
I spent a little time with my checklist and gathered together all the necessary gear and got the two bikes packed up and ready to go.
For Saturday morning, I told Samantha we weren’t in a great hurry. Just to let me know when she was coming over. She’d tried to do a swap but it didn’t seem to work out so she worked half a day and got off late. She headed over after midnight (after shift) and crashed on the couch. I woke her up at 10 and we had a pancake breakfast before heading out.
It’s a bit of a tight turn up at the top of the road so I took the Hayabusa up and got it parked with Samantha walking up. Then I headed back down to the house and grabbed the Concours. I headed back and we were ready to head out.
I had originally planned on a ride up to Cameron Pass to Walden, Steamboat Springs, and spend the night in Craig, but due to being a little later starting, I decided to head down to Nederland and then up to Black Hawk and Central City, take the Central City parkway to Idaho Springs and stop there for gas.
Of course, being Dad, I had a lot of wisdom to impart. Take it easy on the corners, ride your own ride, be careful on Interstate 70 when we get on it. I said I’d stop if I got ahead at a light, don’t freak out 🙂
And we headed out. I kept it easy going. We had all day to get to Grand Junction where we’ll be stopping for the night. It was a nice cool day. I’d checked the weather forecast for Grand Junction and other places on our tour and it was supposed to be in the 80’s plus or minus so it’ll be a pretty nice ride in general. I of course packed all the necessary gear (see checklist) including rain gear and warmer gear because Colorado will surprise you 🙂
We got to Black Hawk without any trouble, cruised up through Central City to the Central City Parkway and headed to I70. It’s a pretty nice ride and yes, I did pass people and Sam did a fine job keeping up. The headlight looks nice and bright behind me 🙂
We made the turn on I70 and headed west. At the Mt Evans exit, I signaled and pulled off to the gas station that I pretty regularly hit when I’m going this way and we stopped for gas and a quick break. And she disappeared! I spent several minutes looking for the ghost of Samantha! She eventually came from behind the store. She’s not comfortable with tighter turns yet so I headed behind the store and brought the bike back around to the parking lot next to me.
One of the things we did a few weeks back was chase down a helmet that fit Samantha better. This is quite a bit nicer, although the black can be a bit hot I think. And Samantha was noticing that on a sport bike, the leaning forward position was putting a little stress on her back muscles. Something she’s not used to using.
After hitting the bathroom, grabbing a soda, and gassing up, we headed west. I do have a tiny bit more experience with the bikes so getting on the freeway and hauling ass is something I’m used to. She did catch up, no problem and we moved along.
It did get a little cooler as we approached the Eisenhower tunnel and of course the ride through the tunnel was an experience as always. On the other side we scooted on down towards Silverthorne. I tend to stop every hour or so for a break and we stopped at the Vail Pass rest area. It was unfortunately closed but we took a break anyway and chatted about the ride so far.
After resting a bit, we headed off yet again. It’s a bit cool and windy but still comfortable and no need for warmer clothes. We next stopped in Eagle for gas and a bathroom break.
And again, after taking a break, gassing up, and grabbing a soda, we headed out again. Probably one more break before hitting Grand Junction. Again, it’s a bit overcast and cool with some wind to deal with. Traffic hasn’t been all that bad honestly.
At the next rest area in Parachute, we stopped again just for a break. The parking lot is at a bit of an angle, not something I typically think of because I’m a big guy and generally able to muscle my way up slight inclines. If it was too steep, I’d back the bike in or pick a different spot. In this case it didn’t seem all that bad. To me at least. Samantha pulled in but decided she’d try to back it out.
Unfortunately, she had a bit of trouble while backing it up and BIKE DOWN!
Awww, poor baby. Fortunately we got help from the rest area care taker and we got the bike back up on her feet. Damage was minimal which is good, all things considered. Humorously I’d been looking at replacement gear shift lever, brake lever, and the gear shifter and rear brake lever but hadn’t actually purchased them (yet).
Note the end of the lever is now gone. But Samantha is sufficiently apologetic 🙂 Unfortunately she did get a “slight” ding on her left leg for some reason. We figure she hit the left side rider’s peg and scraped her shin a bit. It’s not too bad looking but certainly something to remember the ride by.
After checking the bike to make sure she was okay, I backed the bike out and we were on our way to Grand Junction.
I’d called Jeanne to have her check for hotels in Grand Junction and she found a Studio 6 on Horizon Ave. It’s a Motel 6 for longer term “renters”. We pulled in, checked in, and got our room just around back by the pool.
Samantha had been Jonesing about having an Outback steak and I happened to find that Outback had a place in Grand Junction so we headed over for dinner. I’m less a fan of Outback’s steaks but I do like their Bloomin Onion. We ordered dinner and relaxed (although there was some annoying kid next booth over).