New House Time (Radon)

Interesting. Rita found this. Sounds like someone on the sellers team is a scumbag.

Can a home seller beat a radon test (cause it to pass)?

Radon levels will change when you open a window especially if the window is in the same area as the test kit. In general however the window or multiple windows have to be wide open in the test area to make a big change (cut radon levels in half). Opening windows can bring marginal radon levels below the guideline. Opening windows on floors above the area being tested can cause the radon levels to go either higher or lower. Moving the radon detector to a low radon area will obviously also change the results to the new location level but many testers will minimize this possibility with tamper resistant features. We have a full report on test tampering available as a download. Whether you believe radon is over-hyped or not, the EPA risk table graphically illustrates that the exposure risk is very serious and lung cancer is the most deadly cancer.

Yea. That’ll be something that needs to be fixed.

Posted in Uncategorized | Leave a comment

New House Time

We just returned from the inspection (9am to 1pm or so). The guy was pretty thorough. He wanted us there for the inspection so he could educate us on what he’s looking at and make suggestions. We’ll still get the report but talking to him was an education.

House was built in 69. There are a few cracks in the driveway (you can see them in the pics) and a couple in the garage. On the east side of the house there’s a tiny tiny settle crack. Other than that, the exterior is in excellent shape. On the north-western side, the ground slopes a tiny bit to the house. He suggested extensions to the down spouts to get the water farther away from the house. The trees have some dead branches and could use some trimming. The air conditioner can be a bit loud so he suggested a small air conditioner sized fence to redirect the sound away from the patio.

The roof uses T-lock shingles and has two layers. There is a little cracking of the shingles on the south side. The shingles are too close to the roof piercings. The flashing extends 4″ to 6″ from the piercing and if the shingles are butted up next to it, it can collect debris and can damage the roof. So they need to be trimmed. In addition, the piercings need to be painted to prevent rust. An attic investigation shows that the attic fan is falling apart. The investigator recommended a solar powered fan for $200 or so. He also recommended reseating the nails and covering them with a dab of caulk to seal them.

In the basement, the furnace and air conditioner were installed in 2005 and the water heater in 2003. The washer looks to be original though. You can’t even read the Maytag dial any more. The dryer is newer and not gas driven any more. He found that the gas pipe didn’t have a cap (it did have a valve so it’s just good insurance). There’s a sump pump in case there’s any leaking from the surrounding ground but they put a French Drain in a few years ago so the pump container (looks like a 5 gallon paint tub) is bone dry and filled with spider webs. He also found a tiny gas leak that needs to be repaired (at one of the joints). You can just barely smell gas.

Speaking of gas, the Radon test found the 72 hour average is 5.2 which exceeds the recommended maximum of 4. As a side note, she recently married into a local real estate family. When the inspector arrived back on Wednesday, the owner met him on her way out. She was concerned that the house had been sealed up (unused) for several months and wanted to know if that would affect the Radon test. Joe (the inspector) assured her that it wasn’t a problem and that it only lasted 3 to 4 days. Someone (we suspect her new husband) had opened four basement windows to “air out” the basement ::) Joe suggested that if the Radon test had been closer to 4, he would have requested the test be redone but since it’s at 5.2, he’s recommending mitigation using a pressurization system that costs up to $2,000.

Radon (for the folks who don’t know) is a fairly stable radioactive gas with a half life of 3.8 to 4 days (so it goes inert and harmless in about 4 days). Radon is produced naturally however it is one of the causes of lung cancer and the second highest killer in the US (21,000 last year). The gas of course takes the path of least resistance. So in dryer weather, it’ll filter through the dry ground and out through the yard. In wetter weather the damp or frozen ground blocks it so the easier path is up through the concrete of the basement. There are several mitigation systems from rubber barriers (for crawl spaces) to negative pressurization systems.

He suggested replacing the pull out windows in the basement with better quality ones. In addition, the two bedrooms in the basement are non-conforming. In Colorado (and other places I’m sure) basement bedrooms require two means of egress. The door of course and the window. The window wells are pretty tiny so he suggested that if we wanted to have the rooms conform, we get someone in to widen one window in each of the bedrooms to be large enough for someone to escape in case of a fire.

On the main floor, he discussed the gas fireplace. There’s a requirement to prop the flue open so that carbon monoxide doesn’t kill the people in the house. Since we don’t use a fireplace, he suggested we cap the gas line outside, remove the gas fixtures and close the flue and then perhaps put a gate or door in the opening. The kitchen was remodeled recently (we were told $50,000 in work was done). The dishwasher and stove are pretty expensive looking and fancy. There’s also a wall sized built-in between the family room and the kitchen. The front windows (master bedroom and living room… *ahem* I mean Rita’s craft room) are pretty fancy Pella windows however the back part of the house has original windows so we’ll be replacing them too as well as one of the sliding glass doors (there are two).

The master bathroom is very small. Our plan is to tear down the wall between the master bedroom and the center room and then totally remake the bathroom to be a nice sized one (a master bedroom suite). The fun thing is that the toilet and even the toilet hardware (in the tank) are marked as being original equipment. That’s right, 1969! I can’t believe toilet hardware will last that long. The toilet in the main bathroom is also 1969 however the hardware has been replaced. And the basement bathroom is newer.

If you’re keeping track, there are only two things of any concern. The Radon and the tiny gas leak both in the basement. We’ll have the official report later today and will provide our response to the inspection (fix the leak and minimally get bids to mitigate the Radon or have one installed).

Otherwise, great house and a good selection by Rita.

Posted in Uncategorized | Leave a comment

New House Time

Rita found a local company called SmartBox. They deliver a large box and we pack gear into it. Back when we got the house ready (end of January), we had 3 boxes delivered. We packed up most of the gear into the boxes. Just the books in my “Man Cave” (see the post up in the technical section) was about 3,000 pounds (and I had to move it 3 times :crazy2: ). All the book cases went in there, extra furniture. We reduced it down to a bare minimum so the house looked lived in but not cluttered.

Last week we had another box delivered. We put the second couch, dresser, and a bunch of boxes mostly from the garage in that one.

So we’re down to a real bare minimum of stuff.

Master Bedroom: Bed, end tables, dresser
Guest Bedroom: Bed, end tables, dresser, bookcase
TV room: TV, stand, two Ikea chairs
Living room: Couch
Dining room: Table and 4 chairs
Family room: My desk, bookcase
Craft room: Rita’s work table, 2 book cases
Garage: Tool chest, 2 book cases, router table.

And of course a selection of boxes for stuff.

So we’re ready for a quick move 🙂

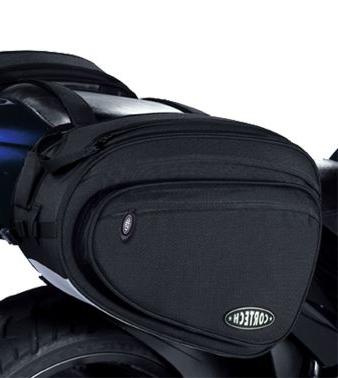
My co-worker lives right around the corner so I’m taking the bikes up there one at a time and parking them in his garage. We’ll be down to just my Hayabusa and Rita’s Ninja (well and her car too 🙂 ).

We’re organized and ready to go 😀

Posted in Cornell | Leave a comment

New House Time

Yep, we finally got the house sold. We had a bit of a problem with the digital document signing (glitch in the company’s software) but it’s been fixed and we’re moving forward. Closing is on the 13th of May and we have to be out by 6pm on the 14th.

Oh, we also found a house. It took a bunch of looking but Rita finally found it. Head over to and look up MLS 583476. Closing is May 14th and we’ll move in on the 15th or so. Cutting it close.

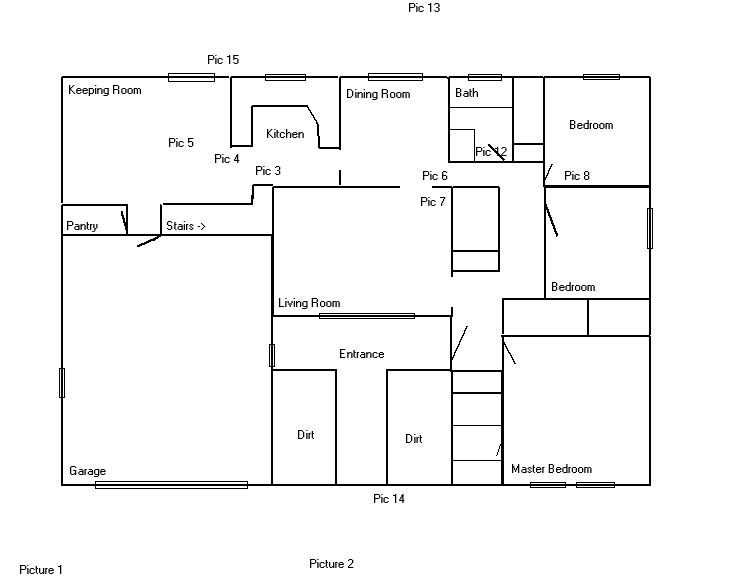
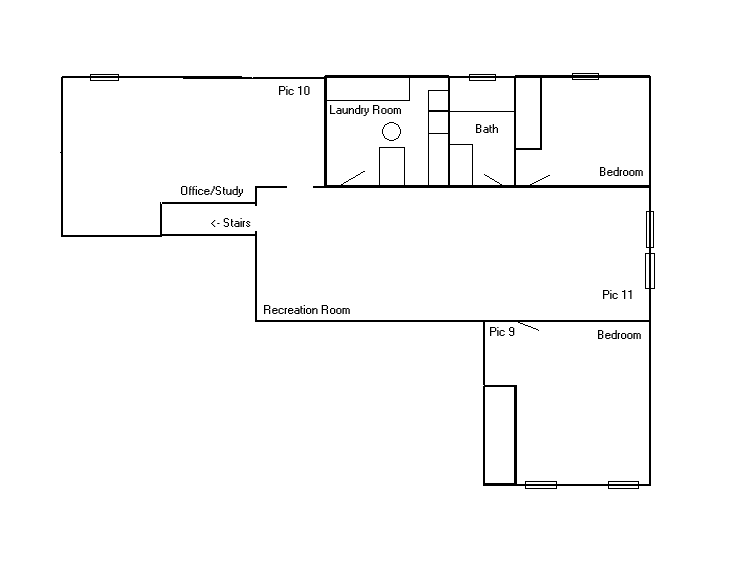
I just whipped up a rough floor plan based on the listed room sizes and put them about where they are in the house.


I put “pic #” around the two plans to show where the pictures in the MLS listing were taken.

The Living Room is going to be Rita’s craft room and the two downstairs bedrooms will be the library and computer room. Rita already has plans for the master bedroom and we’re putting up a fence so we can let the cats go out back.

Posted in Cornell | Leave a comment

Resizing File Systems

This is Linux specific of course. There are three file systems I’ll be listing here. The more common EXT4, newer XFS, and newest GPT file system.

For this example, we have a small image and need to extend it. Additional space has been added to bring the file system to 20 Gigabytes. You just need to expand the space to 20 Gigabytes.

One note here before we continue. Observe that all these examples are a single file system. What that means is extending a partition is pretty easy. But what happens with a normal configuration where there are separate file systems such as root, usr, home, var, etc? If the file system is at the end of the partition table, it’s pretty easy to extend it which is why, typically var is the last file system. But what happens if home needs to be extended? When you’re adding sectors, you add it to the end of a disk. What this means is you need to create a new home file system with the new size, move all the files to the new file system, unmount the old one, fix /etc/fstab, and remount. And now you have the old home directory as a blank spot in your partition table. You might be able to use it to extend usr if it needed extending. Or maybe use it as a /var specific file system such as for mysql. It’s why LVM is so popular.

EXT4 File System

# df -k
Filesystem     1K-blocks   Used Available Use% Mounted on
udev             1014152      0   1014152   0% /dev
tmpfs             204548   2948    201600   2% /run
/dev/vda1        2030416 991160    918068  52% /
tmpfs            1022720      0   1022720   0% /dev/shm
tmpfs               5120      0      5120   0% /run/lock
tmpfs            1022720      0   1022720   0% /sys/fs/cgroup
tmpfs             204544      0    204544   0% /run/user/0

Run the fdisk command to confirm space was added and is recognized.

# fdisk -l
Disk /dev/vda: 20 GiB, 21474836480 bytes, 41943040 sectors
Units: sectors of 1 * 512 = 512 bytes
Sector size (logical/physical): 512 bytes / 512 bytes
I/O size (minimum/optimal): 512 bytes / 512 bytes
Disklabel type: dos
Disk identifier: 0xe5c3b0d8
 
Device     Boot Start     End Sectors Size Id Type
/dev/vda1  *     2048 4194303 4192256   2G 83 Linux

And there it is, 20 GiB. You’ll delete the existing partition table and add it back in at the new size. Until you actually write to the disk, the changes are in memory. Exiting without saving will prevent the update.

# fdisk /dev/vda
 
Welcome to fdisk (util-linux 2.33.1).
Changes will remain in memory only, until you decide to write them.
Be careful before using the write command.
 
 
Command (m for help): p
Disk /dev/vda: 20 GiB, 21474836480 bytes, 41943040 sectors
Units: sectors of 1 * 512 = 512 bytes
Sector size (logical/physical): 512 bytes / 512 bytes
I/O size (minimum/optimal): 512 bytes / 512 bytes
Disklabel type: dos
Disk identifier: 0xe5c3b0d8
 
Device     Boot Start     End Sectors Size Id Type
/dev/vda1  *     2048 4194303 4192256   2G 83 Linux
 
Command (m for help): d
Selected partition 1
Partition 1 has been deleted.
 
Command (m for help): n
Partition type
   p   primary (0 primary, 0 extended, 4 free)
   e   extended (container for logical partitions)
Select (default p): p
Partition number (1-4, default 1): 1
First sector (2048-41943039, default 2048):
Last sector, +/-sectors or +/-size{K,M,G,T,P} (2048-41943039, default 41943039):
 
Created a new partition 1 of type 'Linux' and of size 20 GiB.
Partition #1 contains a ext4 signature.
 
Do you want to remove the signature? [Y]es/[N]o: n
 
Command (m for help): p
 
Disk /dev/vda: 20 GiB, 21474836480 bytes, 41943040 sectors
Units: sectors of 1 * 512 = 512 bytes
Sector size (logical/physical): 512 bytes / 512 bytes
I/O size (minimum/optimal): 512 bytes / 512 bytes
Disklabel type: dos
Disk identifier: 0xe5c3b0d8
 
Device     Boot Start      End  Sectors Size Id Type
/dev/vda1        2048 41943039 41940992  20G 83 Linux
 
Command (m for help): w
The partition table has been altered.
Syncing disks.

From here you can either reboot the server or if partprobe is installed, run it to register the new table to the kernel.

# partprobe

Once registered, you simply extend the file system to fit the now available space using resize2fs.

# resize2fs /dev/vda1
resize2fs 1.44.5 (15-Dec-2018)
Filesystem at /dev/vda1 is mounted on /; on-line resizing required
old_desc_blocks = 1, new_desc_blocks = 3
[ 4014.025845] EXT4-fs (vda1): resizing filesystem from 524032 to 5242624 blocks
[ 4014.172547] EXT4-fs (vda1): resized filesystem to 5242624
The filesystem on /dev/vda1 is now 5242624 (4k) blocks long.

And done, the file system now registers 20 Gigabytes.

# df -k
Filesystem     1K-blocks    Used Available Use% Mounted on
udev             1014152       0   1014152   0% /dev
tmpfs             204548    2948    201600   2% /run
/dev/vda1       20608592 1008764  18723724   6% /
tmpfs            1022720       0   1022720   0% /dev/shm
tmpfs               5120       0      5120   0% /run/lock
tmpfs            1022720       0   1022720   0% /sys/fs/cgroup
tmpfs             204544       0    204544   0% /run/user/0

XFS File Systems

In this case, you won’t need to use fdisk to make the necessary changes. Once the 20 Gig has been added, you just need to run the growpart command to extend the file system.

# growpart /dev/vda 1
CHANGED: partition=1 start=2048 old: size=16384000 end=16386047 new: size=41940992 end=41943039

Then use the xfs_growfs command to extend the file system.

# xfs_growfs -d /dev/vda1
meta-data=/dev/vda1              isize=512    agcount=4, agsize=512000 blks
         =                       sectsz=512   attr=2, projid32bit=1
         =                       crc=1        finobt=1, sparse=1, rmapbt=0
         =                       reflink=1
data     =                       bsize=4096   blocks=2048000, imaxpct=25
         =                       sunit=0      swidth=0 blks
naming   =version 2              bsize=4096   ascii-ci=0, ftype=1
log      =internal log           bsize=4096   blocks=2560, version=2
         =                       sectsz=512   sunit=0 blks, lazy-count=1
realtime =none                   extsz=4096   blocks=0, rtextents=0
data blocks changed from 2048000 to 5242624

And the file system is 20 Gigs now.

GPT File Systems

This one is pretty similar to the EXT4 File System updates. The only change is managing partition tables uses gdisk instead of fdisk. Otherwise everything else is the same as EXT4.

# gdisk /dev/vda
GPT fdisk (gdisk) version 1.0.3
 
Partition table scan:
  MBR: protective
  BSD: not present
  APM: not present
  GPT: present
 
Found valid GPT with protective MBR; using GPT.
 
Command (? for help): p
Disk /dev/vda: 41943040 sectors, 20.0 GiB
Sector size (logical/physical): 512/512 bytes
Disk identifier (GUID): E1A6C9DD-012D-4943-8697-0FE02F412F36
Partition table holds up to 128 entries
Main partition table begins at sector 2 and ends at sector 33
First usable sector is 34, last usable sector is 41943006
Partitions will be aligned on 2048-sector boundaries
Total free space is 37332958 sectors (17.8 GiB)
 
Number  Start (sector)    End (sector)  Size       Code  Name
   1          227328         4612062   2.1 GiB     8300
  14            2048           10239   4.0 MiB     EF02
  15           10240          227327   106.0 MiB   EF00
 
Command (? for help): d
Partition number (1-15): 1
 
Command (? for help): n
Partition number (1-128, default 1): 1
First sector (34-41943006, default = 227328) or {+-}size{KMGTP}:
Last sector (227328-41943006, default = 41943006) or {+-}size{KMGTP}:
Current type is 'Linux filesystem'
Hex code or GUID (L to show codes, Enter = 8300):
Changed type of partition to 'Linux filesystem'
 
Command (? for help): p
Disk /dev/vda: 41943040 sectors, 20.0 GiB
Sector size (logical/physical): 512/512 bytes
Disk identifier (GUID): E1A6C9DD-012D-4943-8697-0FE02F412F36
Partition table holds up to 128 entries
Main partition table begins at sector 2 and ends at sector 33
First usable sector is 34, last usable sector is 41943006
Partitions will be aligned on 2048-sector boundaries
Total free space is 2014 sectors (1007.0 KiB)
 
Number  Start (sector)    End (sector)  Size       Code  Name
   1          227328        41943006   19.9 GiB    8300  Linux filesystem
  14            2048           10239   4.0 MiB     EF02
  15           10240          227327   106.0 MiB   EF00
 
Command (? for help): w
 
Final checks complete. About to write GPT data. THIS WILL OVERWRITE EXISTING
PARTITIONS!!
 
Do you want to proceed? (Y/N): y
OK; writing new GUID partition table (GPT) to /dev/vda.
Warning: The kernel is still using the old partition table.
The new table will be used at the next reboot or after you
run partprobe(8) or kpartx(8)
The operation has completed successfully.

Again, you’ll use partprobe and resize2fs to extend the file system.

Notes

Just noting that this was done quite some time ago and it’s been updated several times over the years to be more current.

Posted in Computers, Troubleshooting | Tagged , , , , , , , , | Leave a comment

Linux Logical Volume Management

Overview

There are many articles and tutorials on the use of the Linux Logical Volume Manager (LVM). I have two goals when I write up these sorts of docs. One to create a document that is appropriate for the environment and two to help others who need the information in the wee hours during an incident or event.

Background

One of the issues with disk management in Linux is being able to extend a file system when needed. Since file systems are generally split up into different uses; root, usr, var, home, and so on, being able to extend that file system when not using LVM means the new space must be contiguous with the file system you want to extend. For this reason, generally var is the last file system created in a system as that’s the file system more likely to need to be extended. The logs get bigger, applications such as mysql are in /var, etc. If a different file system needs to be extended, you have to create a brand new one of the new size, move all the files to the new file system, unmount the old one and mount the new one. This also leaves a gap in the file system usage. As such, when creating file systems admins tend to err on the side of caution and give a bit of extra space.

When using LVM, you add the new disk to the volume group and extend the volume to the necessary size. It does add a layer between the application and the physical disk so there is a minor performance hit. And with the new virtual technology, an admin can add a new disk at the touch of a button.

As a note, the boot disk is a physical slice and not brought under LVM control. This is due to the kernel being located in this file system and loaded prior to the LVM modules. Make sure this file system is large enough to support multiple kernels, about 500 gigabytes.

Commands

There are three groups of commands. Physical Volumes, Volume Groups, and Logical Volumes. Physical Volume commands manage the physical disks. Adding or removing them from LVM and making them available to the system. Volume Groups are collections of one or more Physical Volumes. And Logical Volumes are slices of the Volume Groups.

I’m not going to dig into every command. Feel free to check the references at the end of this article and on Linux server, use the lvm command to see a list of all possible commands on a server.

To view summary information, the pvs (physical volume), vgs (volume group), and lvs (logical volume) commands are used. The pvdisplay, vgdisplay, and lvdisplay provide extended information.

To create LVM volumes, the pvcreate (add a physical disk to lvm), vgcreate (create a volume group), and lvcreate (create a logical volume) commands are used.

To extend LVM volumes, the pvextend, vgextend, and lvextend commands are used. If you’re given a new disk, you would use pvcreate and then vgextend and lvextend. If an existing physical disk is extended though, you’d use pvextend and then lvextend.

Physical Volume Management

You are given a disk to be used for a server and need to add it. First off, you need to add it to LVM. This can be the entire disk or a partition on the disk. A partition will end in a number.

# pvcreate /dev/sda2
# pvcreate /dev/sdb

To view the information, you can use the pvs or pvdisplay command.

# pvs
  PV         VG   Fmt  Attr PSize    PFree
  /dev/sda2  vg00 lvm2 a--    37.79g 4.00m
  /dev/sdb   vg01 lvm2 a--  <100.00g    0
# pvdisplay
  --- Physical volume ---
  PV Name               /dev/sda2
  VG Name               vg00
  PV Size               <37.80 GiB / not usable 4.00 MiB
  Allocatable           yes
  PE Size               4.00 MiB
  Total PE              9675
  Free PE               1
  Allocated PE          9674
  PV UUID               UCPvsu-xHVc-hZ12-CQGW-y3Ss-vfUp-x1zCdS

  --- Physical volume ---
  PV Name               /dev/sdb
  VG Name               vg01
  PV Size               100.00 GiB / not usable 4.00 MiB
  Allocatable           yes (but full)
  PE Size               4.00 MiB
  Total PE              25599
  Free PE               0
  Allocated PE          25599
  PV UUID               eipsjW-KysF-VK4o-mUcV-D4j7-FsOu-uqra6l

Note that the pvdisplay command gives you the number of available or Free Physical Extents. This is the number you’d use when creating a logical volume.

If an existing physical disk is extended, you will need to delete the partition table and recreate it to the new size.

I’ve broken the example below up into sections to make it easier to parse.

# fdisk /dev/sda
Welcome to fdisk (util-linux 2.23.2).

Changes will remain in memory only, until you decide to write them.
Be careful before using the write command.


Command (m for help): p

Disk /dev/sda: 85.9 GB, 85899345920 bytes, 167772160 sectors
Units = sectors of 1 * 512 = 512 bytes
Sector size (logical/physical): 512 bytes / 512 bytes
I/O size (minimum/optimal): 512 bytes / 512 bytes
Disk label type: dos
Disk identifier: 0x000f08ea

   Device Boot      Start         End      Blocks   Id  System
/dev/sda1   *        2048     1026047      512000   83  Linux
/dev/sda2         1026048    80478207    39726080   8e  Linux LVM

Command (m for help): d
Partition number (1,2, default 2): 2
Partition 2 is deleted

Note that the Linux LVM partition is 80k sectors. This equates to about 40 gigabytes. As noted here, you’ve been given 40 gigabytes more space but extending the original disk not as a second disk. You’ll delete the second partition (sda2) and add it back in at the new size.

Again, this is a single session. Do not save until the end.

Command (m for help): n
Partition type:
   p   primary (1 primary, 0 extended, 3 free)
   e   extended
Select (default p): p
Partition number (2-4, default 2): 2
First sector (1026048-167772159, default 1026048): 
Using default value 1026048
Last sector, +sectors or +size{K,M,G} (1026048-167772159, default 167772159): 
Using default value 167772159
Partition 2 of type Linux and of size 79.5 GiB is set

Command (m for help): p

Disk /dev/sda: 85.9 GB, 85899345920 bytes, 167772160 sectors
Units = sectors of 1 * 512 = 512 bytes
Sector size (logical/physical): 512 bytes / 512 bytes
I/O size (minimum/optimal): 512 bytes / 512 bytes
Disk label type: dos
Disk identifier: 0x000f08ea

   Device Boot      Start         End      Blocks   Id  System
/dev/sda1   *        2048     1026047      512000   83  Linux
/dev/sda2         1026048   167772159    83373056   83  Linux

We’ve created a new partition using all the available sectors to extend it to 80 gigabytes. There is a slight issue though. Did you notice it?

Command (m for help): t
Partition number (1,2, default 2): 2
Hex code (type L to list all codes): 8e
Changed type of partition 'Linux' to 'Linux LVM'

Command (m for help): p

Disk /dev/sda: 85.9 GB, 85899345920 bytes, 167772160 sectors
Units = sectors of 1 * 512 = 512 bytes
Sector size (logical/physical): 512 bytes / 512 bytes
I/O size (minimum/optimal): 512 bytes / 512 bytes
Disk label type: dos
Disk identifier: 0x000f08ea

   Device Boot      Start         End      Blocks   Id  System
/dev/sda1   *        2048     1026047      512000   83  Linux
/dev/sda2         1026048   167772159    83373056   8e  Linux LVM

It’s not a Linux LVM partition. You’ll need to change the partition type from Linux to 8e aka Linux LVM.

Command (m for help): w
The partition table has been altered!

Calling ioctl() to re-read partition table.

WARNING: Re-reading the partition table failed with error 16: Device or resource busy.
The kernel still uses the old table. The new table will be used at
the next reboot or after you run partprobe(8) or kpartx(8)
Syncing disks.

And save your changes. Once done, use the partprobe command to have the kernel recognize the new partition table.

# partprobe

And finally you extend the physical volume in LVM.

# pvdisplay
  --- Physical volume ---
  PV Name               /dev/sda2
  VG Name               vg00
  PV Size               37.89 GiB / not usable 3.00 MiB
  Allocatable           yes 
  PE Size               4.00 MiB
  Total PE              9698
  Free PE               2
  Allocated PE          9696
  PV UUID               tsFRnn-bQNH-qm0Q-CY7O-6GTl-93P2-4lbbig
      
# pvresize /dev/sda2
  Physical volume "/dev/sda2" changed
  1 physical volume(s) resized / 0 physical volume(s) not resized
# pvdisplay
  --- Physical volume ---
  PV Name               /dev/sda2
  VG Name               vg00
  PV Size               79.51 GiB / not usable 2.00 MiB
  Allocatable           yes 
  PE Size               4.00 MiB
  Total PE              20354
  Free PE               10658
  Allocated PE          9696
  PV UUID               tsFRnn-bQNH-qm0Q-CY7O-6GTl-93P2-4lbbig

Volume Group Management

Now that you have physical volumes prepared, you need to either add a new volume group or extend an existing one.

# vgextend vg00 /dev/sdb
# vgcreate vg01 /dev/sdc 

In order to view a volume group, you can use the vgs or vgdisplay commands.

# vgs
  VG   #PV #LV #SN Attr   VSize    VFree
  vg00   1   6   0 wz--n-   37.79g 4.00m
  vg01   1   1   0 wz--n- <100.00g    0
# vgdisplay
  --- Volume group ---
  VG Name               vg00
  System ID
  Format                lvm2
  Metadata Areas        1
  Metadata Sequence No  7
  VG Access             read/write
  VG Status             resizable
  MAX LV                0
  Cur LV                6
  Open LV               6
  Max PV                0
  Cur PV                1
  Act PV                1
  VG Size               37.79 GiB
  PE Size               4.00 MiB
  Total PE              9675
  Alloc PE / Size       9674 / <37.79 GiB
  Free  PE / Size       1 / 4.00 MiB
  VG UUID               yTaVIr-8bLB-HvQ9-WSns-LB6O-FYXW-AkydB2

  --- Volume group ---
  VG Name               vg01
  System ID
  Format                lvm2
  Metadata Areas        1
  Metadata Sequence No  2
  VG Access             read/write
  VG Status             resizable
  MAX LV                0
  Cur LV                1
  Open LV               1
  Max PV                0
  Cur PV                1
  Act PV                1
  VG Size               <100.00 GiB
  PE Size               4.00 MiB
  Total PE              25599
  Alloc PE / Size       25599 / <100.00 GiB
  Free  PE / Size       0 / 0
  VG UUID               5Llgfv-9fxg-IxzJ-dT4j-ef5Q-NB0Y-RHL5jS

Logical Volume Management

Now you want to use the available space in file systems. Either by creating a new one or extending an existing file system such as /var.

The logical volume command has two flags for identifying space. The -l (lower case L) flag which uses the physical extents as the option and the -L flag which uses disk sizes in Megabytes, Gigabytes, etc as options.

The -n flag names the file system.

For example, to create a 20 gigabyte file system called fs01 using the vg00 volume group:

# lvcreate -L20G -nfs01 vg00

You can also create one using physical extents. You’ll need to get the amount of Free PE from the output of the pvdisplay command and then calculate what 20 gigabytes might be. In looking at the above examples, 80 gigabytes is approximately 20,354 physical extents. divide by four and you get approximately 5,000 physical extents.

# lvcreate -l5000 -nfs01 vg00

Of course it’s not exactly 20G which is why you’d use the -L flag vs trying to figure out what 20 gigabytes is in physical extents.

Assuming you’re creating a file system, you’ll use the appropriate command to format it. In this example, I’m using a common EXT4 file system but others are available depending on your use case.

# mkfs -t ext4 /dev/mapper/vg00-fs01
mke2fs 1.41.12 (17-May-2010)
Filesystem label=
OS type: Linux
Block size=4096 (log=2)
Fragment size=4096 (log=2)
Stride=0 blocks, Stripe width=0 blocks
4915200 inodes, 19659776 blocks
982988 blocks (5.00%) reserved for the super user
First data block=0
Maximum filesystem blocks=4294967296
600 block groups
32768 blocks per group, 32768 fragments per group
8192 inodes per group
Superblock backups stored on blocks: 
	32768, 98304, 163840, 229376, 294912, 819200, 884736, 1605632, 2654208, 
	4096000, 7962624, 11239424

Writing inode tables: done                            
Creating journal (32768 blocks): done
Writing superblocks and filesystem accounting information: done

This filesystem will be automatically checked every 27 mounts or
180 days, whichever comes first.  Use tune2fs -c or -i to override.

Finally update /etc/fstab to add the mount point for the new file system.

And you’ll use the lvs or lvdisplay commands to view information about the logical volumes on the system.

# lvdisplay
  --- Logical volume ---
  LV Name                /dev/vg00/lv00
  VG Name                vg00
  LV UUID                Zr3Axv-eoOJ-cdM8-Cuvo-t7Db-vlPF-u3wpB3
  LV Write Access        read/write
  LV Status              available
  # open                 1
  LV Size                1.00 GB
  Current LE             32
  Segments               1
  Allocation             inherit
  Read ahead sectors     auto
  - currently set to     256
  Block device           253:0
   
  --- Logical volume ---
  LV Name                /dev/vg00/lv05
  VG Name                vg00
  LV UUID                30VD3I-i90d-Efl1-PReu-0Wi3-V7ri-tyUJ4L
  LV Write Access        read/write
  LV Status              available
  # open                 1
  LV Size                4.00 GB
  Current LE             128
  Segments               1
  Allocation             inherit
  Read ahead sectors     auto
  - currently set to     256
  Block device           253:1
  ...

If you want to extend a logical volume once more space has been added, you’ll use the lvextend command. It works the same as the lvcreate commands with a few changes.

First, you’ll want to pass the -r flag as it extends the file system in addition to extending the logical volume. Much like when you delete a partition and add it back in, and needing to use resize2fs to extend the file system, the -r flag extends the file system.

Next up you can either use a plus to add more space to at logical volume or simply select a larger size than it current is. For example, if you extend a 40 gigabyte logical volume to 80 gigabytes you can either pass -L+40G or -L80G.

# lvextend -r -L+40G /dev/mapper/vg00-fs01
lvextend -- extending logical volume "/dev/vg00/fs01" to 80 GB
lvextend -- doing automatic backup of volume group "vg00"
lvextend -- logical volume "/dev/vg00/fs01" successfully extended

If you forget the -r flag, use the resize2fs command to resize the file system (or other command if not an EXT4 file system).

# resize2fs -p /dev/vg01/fs01
resize2fs 1.41.12 (17-May-2010)
Resizing the filesystem on /dev/vg00/fs01 to 104855552 (4k) blocks.
Begin pass 1 (max = 1600)
Extending the inode table     XXXXXXXXXXXXXXXXXXXXXXXXXXXXXXXXXXXXXXXX
The filesystem on /dev/vg00/fs01 is now 104855552 blocks long.

Removing Volumes

In case you need to remove a logical volume, volume group, or physical volume, use the following commands.

To remove a logical volume, you have to unmount it first. Of course this means making sure no applications are using the file system or you won’t be able to unmount it.

# umount /dev/mapper/vg00-fs01
# lvremove /dev/mapper/vg00-fs01
lvremove -- do you really want to remove "/dev/mapper/vg00-fs01"? [y/n]: y
lvremove -- logical volume "fs01" successfully removed

Don’t forget to remove it from /etc/fstab.

To remove a volume group, run the vgremove command.

# vgremove vg01

If you just need to remove a physical volume from a volume group, use the vgreduce command.

# vgreduce vg01 /dev/sdb

Finally if you need to remove a physical volume from LVM control, use the pvremove command.

# pvremove /dev/sdb

References

A lot of this is experience but the LVM documentation got me started.

Posted in Computers | Tagged , , , , , , , , | Leave a comment

Mom’s Apple Pie

Pie recipe for Mom’s Apple Pie. Includes pie crust. Pretty tasty.

  • 2 Cans of Pie Apples or about 6 medium sized cored and peeled apples plus about a quarter cup of water.
  • 3/4 Cup of Brown Sugar
  • 1/4 Cup of Sugar
  • 4 Tbl Flour
  • 2 Tsp Cinnamon
  • 1 Tsp Nutmeg
  • 3/4 Tsp Cloves
  • 1/4 Tsp Salt

Mix the ingredients in a bowl. Heat the oven to 400F. Put the ingredients into a pie shell and cover. Cook for 1 hour, every 15 minutes spreading a pat of butter on the crust.

Pie Crust

I increased the ingredients a tad to make sure I had enough for crust. I’d rather cut off a bit of dough than have to try and stretch it out a bit and have it be weak or broken through.

  • 2 1/2 Cups of Flour
  • 1 1/4 Tsp Salt
  • 1 Cup Shortening

Mix together until it looks like corn meal. Add up to 8 Tsp cold water. Mix with a fork and press into a ball. Divide in half and roll out on a floured board.

Posted in Cooking | Tagged , , | Leave a comment

Mom’s Cherry Pie

This is my mom’s recipe for cherry pie. It includes making a pie crust as well. I’ve made it for several years and it’s pretty good.

  • 2 Cans of pitted tart red cherries. No cherry pie filling.
  • 1 cup Sugar
  • 4 Tbl Corn Starch
  • 1 Tsp Cloves
  • 2 Tsp Cinnamon

Drain the cherries into the pan and stir in the ingredients until thick. Pour with the cherries into the pie shell. put the top of the pie crust on top. Cut a few slices into the top of the crust. Cook at 400F for about an hour, crust should be brown on top.

Pie Crust

  • 2 Cups of flour
  • 1/2 Tsp Salt
  • 1 Cup butter
  • 7 to 8 Tbl Water

Stir flour and salt into a medium sized bowl with a pastry blender or a fork. Stir in butter until the pieces are pea sized. At the smallest amount of water and toss with a fork until all the flour is moistened and the mixture starts to form a ball. If necessary, add the remaining water to the crumbs in the bottom of the bowl. Gather dough into your hands, split it in half, and gradually shape it into a circle. You’ll need two, top and bottom.

Posted in Cooking | Tagged , , | Leave a comment

Computer Build

Just a table of information as I keep track of the costs for a new system.

Arrived Item Description Amazon TigerDirect NewEgg
2008/10/02 Case Antec 900 ATX Ultimate Gamer PC Case 79.99    
2008/10/04 Power Supply Corsair 750W CMPSU-750TX 105.61    
2008/10/04 Motherboard Gigabyte GA-EP45-DS3R 144.29    
2008/10/02 CPU Intel Core 2 Due Processor E8500, LGA775 Pkg 3.16 GHz, 6MB L2 Cache, 1333 MHz FSB, 45mm     189.99
2008/10/04 CPU Fan Zalman Ultra Quiet CPU Cooler CNPS9700 LED 53.99    
2008/10/02 Thermal Compound Arctic Silver 5 Thermal Compound

    5.99
2008/10/02 Memory OCZ Fatal1ty Pair 2 Gigabyte DDR2 800Mhz Sticks   49.99  
2008/10/21 Memory OCZ Fatal1ty Pair 2 Gigabyte DDR2 800Mhz Sticks   49.99  
2009/09/02 Video Diamond ATI Radeon HD 4870 1GB GDDR5 PCI-E DUAL DVI-I/TVO   130.00  
2008/10/02 Video Diamond ATI Radeon HD 4870 512M GDDR5 4870PE5512   244.99  
2008/10/02 Hard Disk Seagate Barracuda 7200.10 ST3750640AS 750GB 7200 RPM SATA 3.0Gb/s     94.99
2008/10/16 Hard Disk Seagate Barracuda 7200.10 ST3750640AS 750GB 7200 RPM SATA 3.0Gb/s     94.99
2008/10/07 Sound Card Creative Labs X-Fi XtremeGamer SB073A   89.99  
2008/10/07 Speakers Logitech X-540   79.99  
2008/10/07 DVD Sony DRU-V200S-BR DVD+/-R 20x   39.99  
2010/04/17 OS Microsoft Windows 7 Home Premium Upgrade   108.30  
2010/12/24 Monitor Acer G235H   139.99  
2010/12/24 Wall Mount Viewpoint F11 Small Tilt Mount Mount   12.99  
2010/12/24 Cable 6′ DVI Cable   19.99  
2010/12/28 Monitor Acer G235H   139.99  
2010/12/28 Wall Mount Viewpoint F11 Small Tilt Mount Mount   12.99  
2010/12/28 Cable 6′ DVI Cable   19.99  
2010/01/07 Cable 10′ DVI Cable   29.98  
Posted in Computers, Gaming | Leave a comment

Indian Peaks Hike

Last weekend Rita and I went hiking in Indian Peaks Wilderness. It was a short 7.4 mile hike in to the campsite. According to the book, it was somewhat moderate with the last couple of miles being strenuous.

We parked the car at Monarch Lake, put on the backpacks and started off.

Rita at the start of the hike.

One of the many water crossings.

We have this “thing”. We don’t cross bridges without a kiss. So she’s patiently waiting 🙂

The first couple of miles were ok. Mostly slight inclines but when carrying a 40lb pack (it weighed in at 35 lbs but Rita gave me the dried food before we left) it was a tad tiring. It was the first time I’d used the pack and I haven’t backpacked since I was a kid in Boy Scouts. I had the belly belt too high which wasn’t helping 🙂 After about 3 miles, I was ready to stop and camp for the night 😀 We kept going up past the second trail split and stopped for a break.

Rita studying the map

What a view

We continued on to Cascade Falls. We’d been passing folks coming back up to this point. The number of people we passed was severely reduced after this point, about 4.5 miles in.

Rita at the falls.

We spotted a birds nest in the rocks facing the falls. Just stick your beak out for a quick drink 😀

From this point it started getting steeper. There were a few places where there were switchbacks up and down but here is where it generally got rockier and steeper.

Our campsite is at the base of those cliffs.

We passed several meadows.

Rita’s happy to be outside.

Carl’s happy to stop for a moment.

Technically, I had a bit of a headache. I was tapping my head with the walking staff which made it feel better. Better than being hit with the staff anyway 😀

Taking a break.

Getting close to the tree line.

Even the last bit to the lake was tough. I was already dragging tail and then there was another switchback to get to the lake.

We hiked around the lake to get to our site. We went to site 7 which was actually on Crater Lake. The others were either below the switchbacks to the first lake (Mirror Lake) or were on Mirror Lake. There were another 5 sites on the other side but we didn’t investigate.

Stopped. Thank goodness!

From the shore just below our campsite.

We got the tent up and ate some of the food we brought. Dried apple rings, mixed nuts, dried mangos, and dried bananas. Rita had brought the camelbak but we’d run out of water about a mile back.

Back when we first got my backpack, we’d finished hiking 5 miles up into the Sawtooth mountains in northern Idaho. I’d suggested we should do a bit more hiking and even some camping. One of the guys at work was selling his backpack for $25 if I remember correctly. We bought it (reeking of cigarette smoke) and it’s been sitting in the closet up until this point. I took it out of the closet and was getting ready to pack it up when I discovered at the bottom of the pack, a Pur Hiker kit. It’s a water purifying kit. We tested it the night before and decided we’d just need to take the camelbak and this. It’s the reason Rita transferred the food into my backpack. She had the camelbak.

So we took the Hiker kit down to the lake and after a few pumps to clean out the hoses, we filled up the camelbak. The water tasted great 🙂

After a bit, it started to rain. We climbed into the tent and got settled in. I was pretty sore so I really didn’t want to be moving around after that. It started really pouring down. It only lasted a bit though and when it stopped, Rita headed out to look around.

Sleeping that night was pretty much toss and turn all night for both of us. I camp when touring on the bike so I’m used to the tent but generally it’s just the right size for me (it’s a two “man” tent) but with our gear sharing the tent, it was pretty tight. It was also a tad warm in the bags and add in the condensation from our breathing and it was certainly an interesting night.

In the morning we got up and had a bit more to eat. We also refilled the camelbak before we got packed so we’d have it for the hike back.

Our campsite.

Rita having breakfast.

Crater Lake in the morning.

Another morning shot of Crater Lake

One of my favorites. Looking at the reflection of the sun starting to shine on the peaks in the lake. The lake was like glass.

We got the site packed up and made sure everything was picked up. I actually felt a bit better, especially since we were going down hill. One problem I have when hiking is my right foot and my heels. I get a little overextended and they begin to really hurt. For this hike, I made a conscious effort to put my feet flat on the ground instead of walk on rocks. It kept me from having all my weight on one heel/tendon and it kept my right foot from spreading too much and hurting (I’d broken my right little toe so the toe is now sideways and the joint can get very painful). But since I’d been careful, both feet were in pretty good shape.

Chewing on the inside of my mouth and contemplating the hike ahead 🙂

Mirror lake

What’s the best way to cross?

One false step. :crazy2:

Looking back at the lake.

It’s funny how just a different angle of the picture makes such a difference.

A bit higher so the mountain is the focus.

A little lower so the lake is the focus.

There were several water crossings. Some were actually bridges, some were a pair of hewn logs with a hand rail.

Some were just a log high above the water. Carl being sure footed made it without a problem.

“Need some help here”

“Maybe I can cross farther up or down stream.”

There were a few other campers up here. One guy with his dog and then as we passed the campsites, Rita’d go investigate.

Another camper.

A group of folks came up behind us with a dog. Apparently the dog had landed on a stick and gotten impaled 🙁 They were asking if we were doctors and if we had cell service. When we said we didn’t, they continued on.

View back.

One of the stone cairns had been knocked over. When we were heading up, we had to hunt a little to find the trail. On the way back, while we were paused, I set the cairn back up.

There were several really difficult spots including this one where it was simply a water channel we had to carefully pick our way down.

Watch your step

Rita snapped one from the bottom side.

Another of the water crossings.

The crossings were pretty sturdy if a little wobbly.

Hiking through the meadows.

On our way back. Here’s Cascade Falls again. The hike will be a bit better now 🙂

Yea, I’m feeling a tad better 😀

Lots of interesting rocks.

And the water’s getting mellower.

The hike down was a lot better. The only real problem were my feet. They were sliding around in the shoe enough that I could feel myself getting blisters. It was still a bit strenuous though. The last couple of miles had me basically saying “everything else is feeling good, it’s just the feet, just ignore it and keep going.”

Still. It was pretty tiring 😀

Quite pretty though. Nice place for a stop 🙂

When we got to the lake we figured we were done.

Oh wait, it’s at the _other_ end of the lake. One more mile.

We were passing other folks now coming out for their Sunday stroll or fishing.

Hot damn! Monarch Lake

We made it.

7.3 miles (6 hours) up. 7.3 miles (5 hours) down.

We stopped at a gas station where I “old man” walked into the store 😀 We then went through Winter Park and stopped for lunch at a BBQ place. Very good, especially after the hike.

We went over Berthoud Pass and then down 70 towards Denver. At Rt 6, we exited and headed down Coal Creek Canyon to Golden Colorado, up 93 and then home.

All in all it was a fricking tiring hike. It was very pretty and the temps weren’t bad. The mosquitoes were somewhat nuts. I had several on my right arm including one nicely placed to guarantee the raising of a gigantic welt.

That’s the hike. Hope you enjoyed the pics and narrative.

Posted in Hiking and Camping in Indian Peaks Wilderness, Outside Activities | Leave a comment